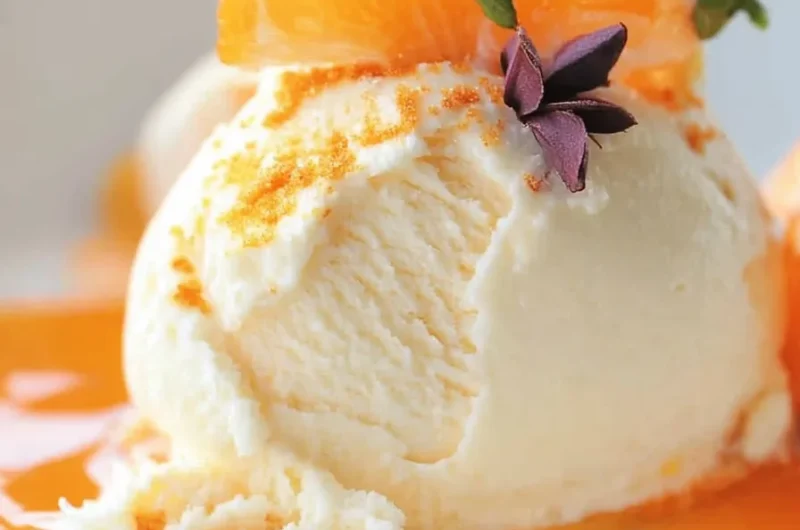
Orange Creamsicle Ice Cream is a delightful dessert that transports you to sunny days with its bright, sweet, and creamy flavor. The perfect combination of orange zest and rich cream creates a nostalgic treat that captures the essence of summer. Whether you’re lounging by the pool or hosting a backyard barbecue, this ice cream is a wonderful addition to any occasion. Trust me; one scoop will take you back to your childhood.
If you’ve ever enjoyed the classic flavor of an orange creamsicle, you’re in for a treat. Homemade ice cream allows you to customize flavors and texture to your preference. This recipe not only delivers incredible taste, but it’s also easy to prepare. You’ll find that making this ice cream can be a fun activity for the entire family. In this guide, we will explore why you will love this recipe, how to prepare it, and tips for serving it perfectly.
With its vibrant orange flavor and creamy base, Orange Creamsicle Ice Cream is more than just a dessert; it’s an experience to be savored. Let’s dive into everything you need to know to create this amazing treat.
Why You’ll Love This Recipe
Orange Creamsicle Ice Cream is a fantastic dessert that stands out for several reasons. Here are just a few of the highlights that you can expect to love:
1. Nostalgic Flavor – This ice cream brings back memories of childhood summer days. It reminds you of those refreshing creamsicle popsicles that everyone loves.
2. Simple Ingredients – The recipe uses basic ingredients, many of which you likely have on hand. This means fewer trips to the grocery store!
3. Easy to Make – Even if you’re a beginner in the kitchen, you can follow this recipe with ease. The steps are straightforward, making it accessible for all skill levels.
4. Versatile Dessert Option – Serve it on its own, in a cone, or as a topping for pies and cakes. The versatility of this ice cream allows you to get creative.
5. Perfect for All Ages – This dessert appeals to both kids and adults alike. It’s a crowd-pleaser that’s sure to satisfy everyone’s sweet tooth.
6. Great for Summer Gatherings – Whether it’s a barbecue, birthday party, or family get-together, this ice cream is a fantastic addition that resonates with warm-weather fun.
With these appealing reasons in mind, you’ll understand why Orange Creamsicle Ice Cream is a popular choice for many dessert lovers. Each spoonful is bursting with flavor and a sense of joy that only a delicious homemade ice cream can bring.
Preparation and Cooking Time
Creating Orange Creamsicle Ice Cream is a straightforward process, and knowing how much time you’ll need can help you plan effectively. Here’s a breakdown of the total time involved:
– Preparation Time: 15 minutes
– Chilling Time: 4-6 hours (This is crucial for achieving the right texture)
– Total Time: About 4 hours and 15 minutes to 6 hours and 15 minutes
The bulk of the time is spent allowing the mixture to chill in the freezer. However, the actual preparation is quick and easy, making it a great dessert option when you’re short on time.
Ingredients
– 2 cups heavy whipping cream
– 1 cup whole milk
– 1 cup granulated sugar
– 1 cup fresh orange juice (preferably from navel oranges)
– Zest of 2 large oranges
– 1 teaspoon vanilla extract
– 1/4 teaspoon salt
– Optional: Orange food coloring (for a more vibrant look)
Step-by-Step Instructions
Making Orange Creamsicle Ice Cream can be an enjoyable process. Follow these simple steps to create your homemade treat:
1. Mix Ingredients: In a large mixing bowl, combine the heavy whipping cream, whole milk, and granulated sugar. Whisk until the sugar is completely dissolved.
2. Add Flavorings: Stir in the fresh orange juice, orange zest, vanilla extract, and salt. Mix thoroughly to ensure everything is well combined.
3. Optional Coloring: If you’d like a brighter color, add a few drops of orange food coloring to the mixture and stir until you achieve your desired shade.
4. Chill the Mixture: Cover the bowl with plastic wrap and refrigerate for at least 2 hours. This helps the flavors meld together and enhances the overall taste.
5. Churn the Ice Cream: Once chilled, pour the mixture into an ice cream maker. Follow the manufacturer’s instructions to churn until it reaches a soft-serve consistency.
6. Freeze Until Firm: Transfer the churned ice cream to an airtight container. Place it in the freezer for at least 4 hours to firm up before serving.
7. Serve and Enjoy: When you’re ready to indulge, scoop the ice cream into bowls or cones and enjoy the delightful flavors of orange creamsicle.
These steps ensure a creamy, delicious dessert that everyone will love. The process is not complicated, yet the outcome is incredibly rewarding.
How to Serve
To elevate the already delightful experience of Orange Creamsicle Ice Cream, consider these serving suggestions:
1. Presentation: Serve in chilled bowls or cones for an appealing look. You might add a sprig of mint on top for a fresh touch.
2. Garnishes: Top with additional orange zest or drizzle with a chocolate sauce for extra flavor and elegance.
3. Pair with Treats: This ice cream pairs wonderfully with brownie sundaes or crumbled cookies. It adds a refreshing twist to classic desserts.
4. Creative Cones: Use sugar cones or waffle cones for serving. You can even create an ice cream sandwich by placing scoops between two cookies.
5. Perfect Portions: Keep scoop sizes reasonable; a smaller serving encourages guests to come back for more without overwhelming them.
By focusing on thoughtful presentation and complementary flavors, you’ll make serving Orange Creamsicle Ice Cream a memorable occasion for everyone involved. Enjoy the cheerful vibes this delightful treat brings!
Additional Tips
– Use Fresh Oranges: For the best flavor, always use fresh oranges for juice and zest instead of bottled options. This enhances the bright, tangy taste of the Orange Creamsicle Ice Cream.
– Chill Your Equipment: Chill the bowl and whisk of your ice cream maker before use. This helps the mixture to freeze faster, resulting in a creamier texture.
– Stir Occasionally: If you don’t have an ice cream maker, pour the mixture into a shallow container and stir every 30 minutes while it freezes. This will help incorporate air and create a smoother consistency.
– Add Texture: For an interesting twist, add in crushed candy or chocolate chips during the last few minutes of churning for a delightful contrast in texture.
Recipe Variation
Looking to explore different flavors? Here are some fun variations of Orange Creamsicle Ice Cream:
1. Clementine Creamsicle: Replace the navel orange juice with clementine juice for a sweeter, less tart flavor.
2. Blood Orange Twist: Substitute regular oranges with blood oranges to create a unique color and taste profile.
3. Citrus Medley: Blend orange juice with lemon or lime juice for a more complex citrus flavor.
4. Coconut Creamsicle: Add a can of coconut milk to the mixture for a tropical twist that complements the orange beautifully.
Freezing and Storage
– Proper Storage: To store your Orange Creamsicle Ice Cream, place it in an airtight container. This will prevent ice crystals from forming and maintain its creamy texture.
– Duration: The ice cream will stay fresh in the freezer for about 2-3 weeks. However, for the best taste and texture, it’s recommended to consume it within the first week.
– Thawing Tips: When you’re ready to enjoy your ice cream, let it sit at room temperature for about 5-10 minutes before scooping. This makes it easier to scoop out.
Special Equipment
To make your homemade Orange Creamsicle Ice Cream, you’ll need some essential tools:
– Ice Cream Maker: This is the best tool to create a creamy texture. If you don’t have one, a shallow dish can work, but results may vary.
– Mixing Bowls: A large mixing bowl is needed for combining ingredients easily.
– Hand Mixer or Whisk: These will help you blend the mixture until smooth. A hand mixer makes the process quicker.
– Airtight Container: For storing the finished ice cream in the freezer, an airtight container ensures long-lasting freshness.
Frequently Asked Questions
Can I use a different type of milk?
Yes, you can use low-fat milk or even dairy alternatives like almond or coconut milk. However, this may affect the creaminess of your ice cream.
What if I don’t have an ice cream maker?
You can still make this ice cream without an ice cream maker by stirring every 30 minutes until it reaches the desired consistency.
How can I make my ice cream sweeter?
If the ice cream isn’t sweet enough for your taste, you can adjust the sugar content when mixing the ingredients.
Can I use frozen oranges?
Fresh oranges are recommended, but if you only have frozen oranges, ensure they are thawed and well-drained before juicing and zesting.
Can I add alcohol to the mix?
Adding a tablespoon of vodka or orange liqueur can prevent ice crystals and keep the ice cream creamy, but use sparingly.
Conclusion
Orange Creamsicle Ice Cream is a nostalgic treat that captures the essence of summer in every scoop. With its simple ingredients and straightforward process, making this delightful ice cream at home is both satisfying and enjoyable. Whether you’re sharing it with your family or savoring it all on your own, this sweet and tangy dessert will surely brighten your day. Make this recipe today and dive into a creamy, orange-flavored paradise!
Orange Creamsicle Ice Cream: An Amazing Ultimate Recipe
- Total Time: 15 minutes
Ingredients
– 2 cups heavy whipping cream
– 1 cup whole milk
– 1 cup granulated sugar
– 1 cup fresh orange juice (preferably from navel oranges)
– Zest of 2 large oranges
– 1 teaspoon vanilla extract
– 1/4 teaspoon salt
– Optional: Orange food coloring (for a more vibrant look)
Instructions
Making Orange Creamsicle Ice Cream can be an enjoyable process. Follow these simple steps to create your homemade treat:
1. Mix Ingredients: In a large mixing bowl, combine the heavy whipping cream, whole milk, and granulated sugar. Whisk until the sugar is completely dissolved.
2. Add Flavorings: Stir in the fresh orange juice, orange zest, vanilla extract, and salt. Mix thoroughly to ensure everything is well combined.
3. Optional Coloring: If you’d like a brighter color, add a few drops of orange food coloring to the mixture and stir until you achieve your desired shade.
4. Chill the Mixture: Cover the bowl with plastic wrap and refrigerate for at least 2 hours. This helps the flavors meld together and enhances the overall taste.
5. Churn the Ice Cream: Once chilled, pour the mixture into an ice cream maker. Follow the manufacturer’s instructions to churn until it reaches a soft-serve consistency.
6. Freeze Until Firm: Transfer the churned ice cream to an airtight container. Place it in the freezer for at least 4 hours to firm up before serving.
7. Serve and Enjoy: When you’re ready to indulge, scoop the ice cream into bowls or cones and enjoy the delightful flavors of orange creamsicle.
These steps ensure a creamy, delicious dessert that everyone will love. The process is not complicated, yet the outcome is incredibly rewarding.
- Prep Time: 15 minutes
- Cook Time: 0 minutes
Nutrition
- Serving Size: 8 servings
- Calories: 250 kcal
- Fat: 14g
- Protein: 3g