
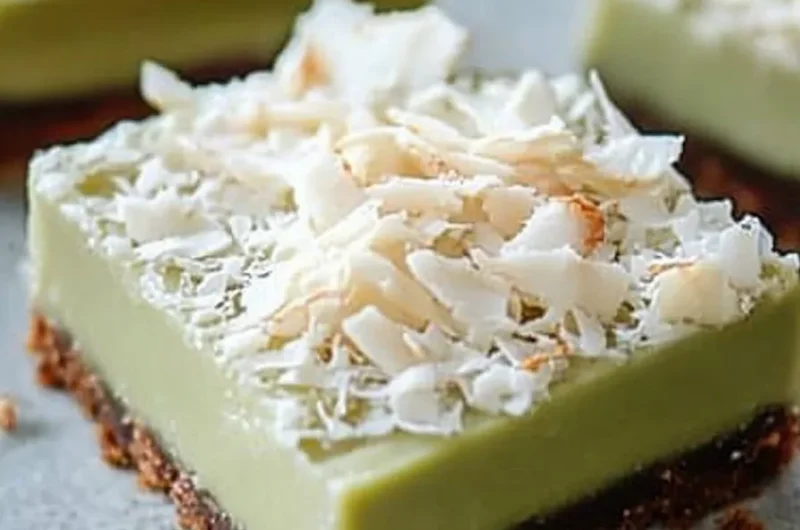
Coconut Lime Bars are a delightful treat that perfectly captures the essence of tropical flavors. The sweet creaminess of coconut combined with the tangy zest of lime creates a refreshing dessert that feels like a warm summer day. These bars are not only delicious but also incredibly easy to make. They offer a wonderful balance of flavors that’s sure to please anyone lucky enough to have a bite. If you’re looking for a scrumptious dessert to brighten up any occasion or simply want to indulge your sweet tooth, Coconut Lime Bars will surely become your new favorite recipe!
Imagine sinking your teeth into a rich and soft coconut bar that sings with lime-infused goodness. The moment you taste these Coconut Lime Bars, you’ll be transported to a beach paradise, feeling the warmth of the sun and the relaxing sound of waves. They are great for picnics, barbecues, or as a light after-dinner treat. The beautiful presentation and irresistible flavors will certainly impress your family and friends, making these bars a must-have on your dessert table!
In this article, you will discover why this recipe is a go-to for many bakers, how to make these Coconut Lime Bars from scratch, and tips on serving them beautifully. Whether you’re an experienced cook or just starting, the incredible taste of these bars will inspire you to whip up a batch and share them with those you love.
Why You’ll Love This Recipe
Coconut Lime Bars offer an array of reasons you’ll cherish this refreshing dessert. Here are a few compelling factors:
1. Simple Ingredients: Most of the ingredients are pantry staples, making it easy to whip up on a whim.
2. Versatile Flavor Profile: The combination of coconut and lime can be adjusted to suit your taste, whether you want to amplify the coconut or add more zing.
3. No-Bake Option Available: If you’re short on time, there’s a no-bake version that still delivers on flavor.
4. Perfect for Sharing: The bars can be easily cut into squares, making them perfect for gatherings or packed lunches.
5. Light and Refreshing: They provide a unique dessert that’s light yet filling – ideal for warm weather.
6. Kids-Friendly: With the sweetness of coconut and lime, children will love these bars just as much as adults.
These factors add to the endless appeals, ensuring that once you make Coconut Lime Bars, you’ll be asked for a repeat performance!
Preparation and Cooking Time
Coconut Lime Bars can be made relatively quickly. Here’s an overview of the time required:
– Preparation Time: 15 minutes
– Cooking Time: 25-30 minutes
– Cooling Time: 2-3 hours (for the best texture)
In total, you can expect the process to take about 2 to 2.5 hours, depending on how quickly you work and how long you let them chill.
Ingredients
– 1 cup all-purpose flour
– 1 cup sweetened shredded coconut
– 1/2 cup unsalted butter, melted
– 1/2 cup granulated sugar
– 1/4 cup packed brown sugar
– 1/4 teaspoon salt
– 2 large eggs
– Zest of 2 limes
– 1/4 cup fresh lime juice (from about 2-3 limes)
– 1 teaspoon vanilla extract
– 1 teaspoon baking powder
– Powdered sugar, for dusting (optional)
Step-by-Step Instructions
Creating Coconut Lime Bars is simple and straightforward if you follow these steps:
1. Preheat your Oven: Set your oven to 350°F (175°C) and grease a 9×9-inch baking dish with non-stick spray or line it with parchment paper for easy removal.
2. Combine Dry Ingredients: In a medium bowl, whisk together the flour, shredded coconut, brown sugar, granulated sugar, salt, and baking powder until evenly blended.
3. Mix Wet Ingredients: In another bowl, whisk together melted butter, eggs, lime zest, lime juice, and vanilla extract until well combined.
4. Combine Mixtures: Pour the wet ingredients into the dry ingredients and mix until just combined. Avoid overmixing.
5. Bake: Pour the batter into the prepared baking dish and smooth out the top. Bake in the preheated oven for 25-30 minutes, or until the edges begin to turn golden and a toothpick inserted into the center comes out clean.
6. Cool: Remove from the oven and let the bars cool in the pan for about 10 minutes. Then transfer them to a wire rack to cool completely.
7. Chill: Once cooled, refrigerate the bars for at least 2 hours for the best texture and flavor.
8. Dust: Before serving, dust the top with powdered sugar if desired.
9. Slice and Serve: Cut into squares and enjoy!
By following these easy steps, you’ll have delicious Coconut Lime Bars ready to share with friends and family.
How to Serve
When serving Coconut Lime Bars, consider the following tips to enhance the presentation and experience:
1. Garnish: Add lime slices or zest on top for an appealing garnish. A sprig of mint could also elevate the appearance.
2. Presentation: Use a decorative plate or tiered dessert stand to make the bars look more inviting.
3. Accompaniments: Pair with a dollop of whipped cream or a scoop of coconut or vanilla ice cream for added indulgence.
4. Beverage Pairings: Serve with iced tea or a refreshing limeade to complement the flavors.
5. Choose Thoughtful Portions: Cut the bars into small squares; smaller treats encourage guests to take more than one!
Serving Coconut Lime Bars with a touch of care will make these delightful treats even more memorable. Enjoy the freshness of the coconut and lime as you treat yourself and others to this incredible dessert!
Additional Tips
– Use Fresh Ingredients: For the best flavor, use fresh limes for juice and zest. The brightness of the fresh lime greatly enhances the taste of Coconut Lime Bars.
– Keep It Chilled: These bars taste even better when they are chilled. Letting them sit in the fridge for a few hours allows the flavors to meld beautifully.
– Experiment with Zest: If you want a stronger citrus flavor, consider adding an extra teaspoon of lime zest to enhance the aroma and taste further.
Recipe Variation
Feel free to customize your Coconut Lime Bars with these fun variations:
1. Tropical Flavors: Add diced pineapple or mango to the batter for a tropical twist that complements the coconut and lime.
2. Coconut Whipped Topping: Top the bars with a light dollop of coconut whipped cream for added flavor and a fun presentation.
3. Lemon Lime Bars: Substitute lime juice with lemon juice for a citrus-forward variation that changes up the flavor profile entirely.
Freezing and Storage
– Storage: Coconut Lime Bars can be stored in an airtight container in the refrigerator for up to a week.
– Freezing: If you have leftovers, wrap the bars tightly in plastic wrap and foil. They can be frozen for up to 3 months for a refreshing treat anytime.
Special Equipment
You’ll need a few essential tools to make your Coconut Lime Bars:
– Mixing bowls: For combining dry and wet ingredients.
– Whisk: To ensure your ingredients are mixed thoroughly.
– Baking dish: A 9×9-inch pan works perfectly for this recipe.
– Wire rack: For cooling the bars after baking properly.
Frequently Asked Questions
Can I use unsweetened coconut instead of sweetened?
Yes, but the bars will be less sweet. You may wish to adjust the sugar content accordingly.
Can I double the recipe?
Absolutely! Just use a larger baking dish. A 9×13-inch pan works well for doubling the batch.
How do I know when my Coconut Lime Bars are done?
They’re done when the edges turn a light golden brown and a toothpick inserted into the center comes out clean.
Can I use bottled lime juice?
While fresh is always best, bottled lime juice can work in a pinch, though the flavor may not be as vibrant.
Conclusion
Coconut Lime Bars are an unforgettable dessert that transports you to a tropical paradise with each bite. Their balance of creamy coconut and zesty lime creates a refreshing treat that’s perfect for any occasion. Whether you serve them at a summer barbecue or as a light post-dinner dessert, they are sure to impress. Enjoy the process of making and sharing these delightful bars, and let them become a staple in your dessert repertoire!
Coconut Lime Bars: An Incredible Ultimate Recipe for Summer
- Total Time: 31 minute
Ingredients
– 1 cup all-purpose flour
– 1 cup sweetened shredded coconut
– 1/2 cup unsalted butter, melted
– 1/2 cup granulated sugar
– 1/4 cup packed brown sugar
– 1/4 teaspoon salt
– 2 large eggs
– Zest of 2 limes
– 1/4 cup fresh lime juice (from about 2-3 limes)
– 1 teaspoon vanilla extract
– 1 teaspoon baking powder
– Powdered sugar, for dusting (optional)
Instructions
Creating Coconut Lime Bars is simple and straightforward if you follow these steps:
1. Preheat your Oven: Set your oven to 350°F (175°C) and grease a 9×9-inch baking dish with non-stick spray or line it with parchment paper for easy removal.
2. Combine Dry Ingredients: In a medium bowl, whisk together the flour, shredded coconut, brown sugar, granulated sugar, salt, and baking powder until evenly blended.
3. Mix Wet Ingredients: In another bowl, whisk together melted butter, eggs, lime zest, lime juice, and vanilla extract until well combined.
4. Combine Mixtures: Pour the wet ingredients into the dry ingredients and mix until just combined. Avoid overmixing.
5. Bake: Pour the batter into the prepared baking dish and smooth out the top. Bake in the preheated oven for 25-30 minutes, or until the edges begin to turn golden and a toothpick inserted into the center comes out clean.
6. Cool: Remove from the oven and let the bars cool in the pan for about 10 minutes. Then transfer them to a wire rack to cool completely.
7. Chill: Once cooled, refrigerate the bars for at least 2 hours for the best texture and flavor.
8. Dust: Before serving, dust the top with powdered sugar if desired.
9. Slice and Serve: Cut into squares and enjoy!
By following these easy steps, you’ll have delicious Coconut Lime Bars ready to share with friends and family.
- Prep Time: 15 minutes
- Cook Time: 25-30 minutes
Nutrition
- Serving Size: 9 bars
- Calories: 170 kcal
- Fat: 8g
- Protein: 2g