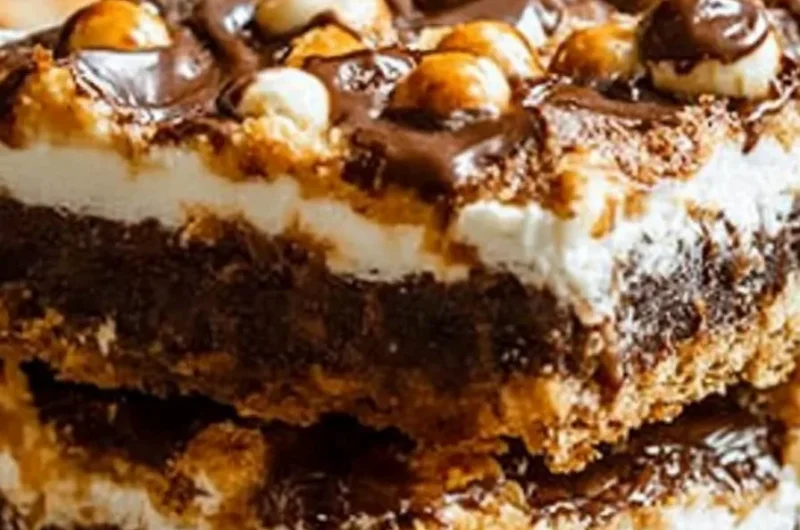
S’more Bars are the ultimate treat for anyone who craves that nostalgic camping dessert. The combination of gooey marshmallows, rich chocolate, and a graham cracker crust takes the classic s’more to a whole new level. Imagine indulging in these bars while relaxing with friends and family, reminiscing about summer nights spent around a campfire. This recipe transforms that experience into a convenient dessert that can be enjoyed any time of the year.
These delectable bars are not only a delightful way to satisfy your sweet tooth, but they also evoke feelings of warmth and comfort. With each bite, you’re transported to a cozy outdoor scene, surrounded by laughter and joy. Whether you’re hosting a gathering or simply treating yourself, S’more Bars are a wonderful addition to your dessert repertoire.
In this article, you will discover the reasons why this recipe is a must-try, tips on preparation and cooking times, a comprehensive list of ingredients, step-by-step instructions, and serving suggestions. With plenty of information at your fingertips, creating these amazing S’more Bars will be a breeze. Let’s dive in!
Why You’ll Love This Recipe
There are several reasons why S’more Bars should be on your dessert list. Here are some key points that highlight their appeal:
1. Easy to Make: The simple steps make these bars approachable for bakers of any skill level.
2. No Campfire Needed: Enjoy the classic s’more flavor without needing to light a fire.
3. Perfect for Sharing: Cut into squares, these bars are great for parties, potlucks, or family gatherings.
4. Customizable: You can easily adjust the toppings or add mix-ins like nuts or peanut butter.
5. Irresistible Flavor: The combination of chocolate, marshmallow, and graham cracker makes for a deliciously harmonious treat.
6. Great for Meal Prep: Make a batch ahead of time and store them for a quick dessert option throughout the week.
7. Kid-Friendly Fun: These bars are a hit with kids, making them a great way to involve little helpers in the kitchen.
With these factors in mind, it’s easy to see why S’more Bars are a go-to dessert for so many. They bring a sense of joy and nostalgia, ensuring that each bite is as comforting as it is delicious!
Preparation and Cooking Time
Making S’more Bars is a straightforward process that doesn’t take too much of your time. Here’s a breakdown of the total preparation and cooking time you can expect:
– Preparation Time: 15 minutes
– Cooking Time: 25 minutes
– Cooling Time: 30 minutes
In total, you’ll spend about 1 hour and 10 minutes from start to finish. These times might vary slightly based on your kitchen setup, but the framework provides a great estimate.
Ingredients
– 1 ½ cups graham cracker crumbs
– ½ cup unsalted butter, melted
– ⅓ cup granulated sugar
– 1 cup semi-sweet chocolate chips
– 2 cups mini marshmallows
– ½ teaspoon vanilla extract
– ¼ teaspoon salt
– Cooking spray or additional butter for greasing
Step-by-Step Instructions
Creating S’more Bars can be straightforward if you follow these essential steps:
1. Preheat Oven: Begin by preheating your oven to 350°F (175°C). Grease an 8×8-inch baking dish with cooking spray or butter.
2. Prepare Crust Mixture: In a mixing bowl, combine graham cracker crumbs, melted butter, granulated sugar, and salt. Mix well until the mixture resembles wet sand.
3. Press Down: Firmly press the crust mixture into the bottom of the prepared baking dish, ensuring an even layer.
4. Bake the Crust: Place the crust in the preheated oven and bake for 10 minutes or until lightly golden. Remove from the oven and let it cool for a few minutes.
5. Layer Chocolate Chips: Evenly spread the semi-sweet chocolate chips over the partially baked crust, ensuring all areas are covered.
6. Add Mini Marshmallows: Sprinkle the mini marshmallows over the chocolate chips, covering as much of the area as possible.
7. Return to Oven: Bake again for an additional 15 minutes or until the marshmallows turn golden brown and puffed.
8. Cool the Bars: Remove from the oven and allow the S’more Bars to cool in the pan for about 30 minutes.
9. Cut and Serve: Once cooled, use a sharp knife to cut into squares and serve.
These steps will lead you to beautifully baked S’more Bars that are sure to impress everyone.
How to Serve
When it comes to serving your S’more Bars, consider the following tips to elevate the experience:
1. Presentation: Arrange the bars on a decorative platter for an inviting look. You can also use parchment paper for easy serving.
2. Garnish: Drizzle chocolate sauce over the top or sprinkle some graham cracker crumbs for added flair.
3. Accompaniments: Pair with a scoop of vanilla ice cream or a dollop of whipped cream for extra indulgence.
4. Beverage Pairing: Serve with a warm cup of hot cocoa or a refreshing glass of milk to complement the flavors.
5. Portion Sizes: Cut the bars into small, manageable squares to encourage guests to enjoy more than one!
6. Storage Recommendations: Store any leftovers in an airtight container at room temperature for up to a week.
By focusing on presentation and accompaniments, you can ensure the S’more Bars are as delightful to serve as they are to enjoy!
Additional Tips
– Use High-Quality Ingredients: The flavor of your S’more Bars can greatly improve with premium chocolate and fresh marshmallows. Opt for brands you trust.
– Let Them Cool Completely: Allowing the bars to cool completely ensures better slicing and prevents the gooey marshmallows from sticking.
– Experiment with Toasted Flavors: For an extra depth of flavor, lightly toast your graham crackers before processing them into crumbs.
– Watch for Doneness: Keep an eye on the bars during the second bake. Overbaking can lead to hard marshmallows that lose their chewy texture.
– Add a Touch of Salt: A sprinkle of flaky sea salt on top before serving can enhance the sweetness and provide a delightful contrast.
Recipe Variation
Get creative in the kitchen! Here are some variations on traditional S’more Bars to keep things interesting:
1. Peanut Butter Twist: Add a layer of creamy peanut butter between the chocolate and marshmallows for a sweet and salty combination.
2. Minty S’mores: Incorporate mint chocolate chips instead of semi-sweet chocolate for a refreshing take on the classic.
3. Vegan Version: Substitute regular graham crackers with vegan ones, and use dairy-free chocolate chips and marshmallows to cater to dietary restrictions.
4. Fruity Addition: Fold in some chopped strawberries or bananas with the marshmallows for a fruity surprise.
Freezing and Storage
– Storage: Keep your S’more Bars in an airtight container at room temperature for up to a week. Enjoy them fresh for the best texture.
– Freezing: You can freeze the S’more Bars for up to three months. Cut them into squares, wrap them individually, and store in an airtight container to avoid freezer burn. Thaw overnight in the refrigerator before enjoying.
Special Equipment
To make delicious S’more Bars without hassle, gather these essential tools:
– 8×8-inch baking dish
– Mixing bowls for combining ingredients
– Measuring cups and spoons for accuracy
– Parchment paper (optional) for easy removal
– A sharp knife to cut the bars
Frequently Asked Questions
1. Can I use different types of chocolate?
Yes! Feel free to experiment with dark chocolate, milk chocolate, or even white chocolate for your S’more Bars.
2. Can I make these bars gluten-free?
Absolutely! Use gluten-free graham crackers to customize the recipe for gluten-sensitive diets.
3. How do I know when the marshmallows are done?
The marshmallows should be puffed up and golden brown when finished baking.
4. How long do they need to cool?
It’s best to let your S’more Bars cool for at least 30 minutes so they set properly before cutting.
5. Can I use regular-sized marshmallows instead of mini?
You can, but you will need to chop them into smaller pieces to ensure even distribution over the chocolate layer.
Conclusion
In conclusion, S’more Bars are an exciting twist on a classic favorite that combines nostalgia with convenience. Their gooey marshmallows, rich chocolate, and crunchy graham cracker crust create a dessert that’s sure to delight everyone. With endless possibilities for variations and easy preparation, you’ll find yourself reaching for this recipe again and again. Whether you’re sharing at a gathering or indulging on your own, S’more Bars are a sweet escape that brings joy to every occasion.
Amazing Ultimate S’more Bars: 7 Reasons You Need to Try This Recipe
- Total Time: 40 minutes
Ingredients
– 1 ½ cups graham cracker crumbs
– ½ cup unsalted butter, melted
– ⅓ cup granulated sugar
– 1 cup semi-sweet chocolate chips
– 2 cups mini marshmallows
– ½ teaspoon vanilla extract
– ¼ teaspoon salt
– Cooking spray or additional butter for greasing
Instructions
Creating S’more Bars can be straightforward if you follow these essential steps:
1. Preheat Oven: Begin by preheating your oven to 350°F (175°C). Grease an 8×8-inch baking dish with cooking spray or butter.
2. Prepare Crust Mixture: In a mixing bowl, combine graham cracker crumbs, melted butter, granulated sugar, and salt. Mix well until the mixture resembles wet sand.
3. Press Down: Firmly press the crust mixture into the bottom of the prepared baking dish, ensuring an even layer.
4. Bake the Crust: Place the crust in the preheated oven and bake for 10 minutes or until lightly golden. Remove from the oven and let it cool for a few minutes.
5. Layer Chocolate Chips: Evenly spread the semi-sweet chocolate chips over the partially baked crust, ensuring all areas are covered.
6. Add Mini Marshmallows: Sprinkle the mini marshmallows over the chocolate chips, covering as much of the area as possible.
7. Return to Oven: Bake again for an additional 15 minutes or until the marshmallows turn golden brown and puffed.
8. Cool the Bars: Remove from the oven and allow the S’more Bars to cool in the pan for about 30 minutes.
9. Cut and Serve: Once cooled, use a sharp knife to cut into squares and serve.
These steps will lead you to beautifully baked S’more Bars that are sure to impress everyone.
- Prep Time: 15 minutes
- Cook Time: 25 minutes
Nutrition
- Serving Size: 9 bars
- Calories: 180 kcal
- Fat: 9g
- Protein: 2g