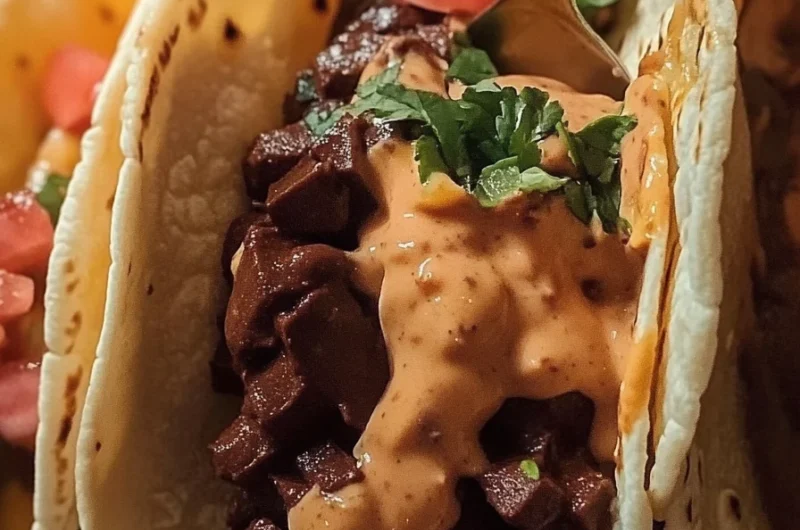
Homemade Choco Tacos are a delightful way to enjoy a beloved treat right from the comfort of your home. These amazing creations combine crunchy taco shells with a luscious filling of creamy ice cream and a rich chocolate coating. They’re not just desserts; they’re experiences waiting to happen, perfect for summer evenings, birthday parties, or simply satisfying a late-night craving. The blend of textures—crisp, creamy, and smooth—creates an indulgence that everyone will love.
If you’ve ever craved a Choco Taco but couldn’t find one at the store, you’re in for a treat! Making these homemade versions is easier than you might think. With this ultimate guide, you’ll learn everything you need to know about crafting these amazing frozen desserts from scratch. From choosing your base ingredients to the final presentation, this recipe will have you shouting from the rooftops!
Imagine biting into a crisp taco shell filled with creamy ice cream, dipped in rich chocolate, and adorned with your favorite toppings. Homemade Choco Tacos offer limitless possibilities for customization. You can experiment with different ice cream flavors, add nuts, sprinkles, or even drizzle caramel. By the end of this guide, you’ll understand why these tasty treats deserve a spot in your dessert rotation.
Now, let’s dive into the wonderful world of Homemade Choco Tacos, starting with why this recipe is a must-try!
Why You’ll Love This Recipe
Homemade Choco Tacos are not only a crowd-pleaser but also incredibly versatile. Here are several reasons to fall in love with this recipe:
1. Endless Flavor Combinations: You can mix and match flavors of ice cream and toppings to suit your taste.
2. Fun to Make: Crafting these tacos is an enjoyable activity for both kids and adults. It’s like a mini art project!
3. Perfect for Warm Days: These refreshing treats are ideal for summer gatherings or any occasion when you want something cool and sweet.
4. Impressive Presentation: The unique shape and delicious toppings make them visually appealing.
5. Customizable Shelves: You can easily make gluten-free or dairy-free variants by opting for suitable ingredients.
6. Easy-to-Follow Steps: The straightforward instructions make it accessible to even novice cooks.
With so many delicious possibilities and fun aspects to this recipe, it’s no wonder that Homemade Choco Tacos are gaining popularity!
Preparation and Cooking Time
Preparing Homemade Choco Tacos requires a little patience but is well worth the effort. Here’s a breakdown of the time involved:
– Preparation Time: 30 minutes
– Chilling Time: 1-2 hours (for the ice cream to firm up)
– Serving Preparation Time: 15 minutes
In total, you can expect to spend around 1 hour and 45 minutes before you can dig into your delicious creations!
Ingredients
– 1 cup all-purpose flour
– 3 tablespoons powdered sugar
– 1/4 teaspoon salt
– 4 tablespoons unsalted butter, melted
– 1 large egg
– 1 cup ice cream (your choice of flavor)
– 1 cup chocolate chips (for coating)
– 1 tablespoon coconut oil (for melting chocolate)
– Optional toppings (sprinkles, chopped nuts, etc.)
Step-by-Step Instructions
Creating delightful Homemade Choco Tacos is easy if you follow these simple steps:
1. Preheat Oven: Preheat your oven to 375°F (190°C). Line a baking sheet with parchment paper.
2. Mix Dry Ingredients: In a mixing bowl, combine flour, powdered sugar, and salt until thoroughly mixed.
3. Combine Wet Ingredients: In a separate bowl, whisk together melted butter and egg until well blended.
4. Combine Mixtures: Gradually add the wet mixture to the dry ingredients until a dough forms. The dough should be soft but not sticky.
5. Shape Tacos: Use about a tablespoon of dough for each taco. Press the dough into mini taco molds or form them into the shape of taco shells using your hands and place them on the baking sheet.
6. Bake: Bake for 8-10 minutes or until the edges are lightly golden. Remove from the oven and let them cool completely.
7. Fill with Ice Cream: Once cooled, carefully fill each taco shell with your chosen ice cream flavor using a spoon or piping bag.
8. Freeze: Place the filled tacos on a tray and freeze for at least 1 hour to ensure they hold their shape.
9. Prepare Chocolate Coating: In a heatproof bowl, combine chocolate chips and coconut oil. Melt in the microwave in 30-second increments, stirring until smooth.
10. Dip Tacos: Once the tacos have firmed up, dip the edges in the melted chocolate to coat and allow excess to drip off.
11. Garnish: Quickly add your favorite toppings before the chocolate sets.
12. Final Freeze: Return the tacos to the freezer again for about 30 minutes to set the chocolate coating.
Follow these easy steps, and you’ll have beautiful, delicious Homemade Choco Tacos ready to enjoy.
How to Serve
When it comes to serving your Homemade Choco Tacos, presentation and creativity can take your dessert to the next level. Here are some tips:
1. Serving Style: Arrange the tacos on a decorative plate or serving platter for a stunning display.
2. Accompaniments: Consider serving with additional toppings, like whipped cream, chocolate sauce, or fresh fruit.
3. Personal Touch: Provide a variety of sprinkles or flavored syrups on the side for guests to customize their tacos.
4. Chilled Plates: Serve the tacos on chilled plates to keep them from melting too quickly, adding to the experience.
5. Dessert Station: Set up a fun dessert station with different flavors of ice cream, toppings, and sauces for a DIY taco experience.
Serve your Homemade Choco Tacos with flair, and watch as your guests rave about these amazing treats!
Enjoy your culinary journey into the delightful world of Homemade Choco Tacos!
Additional Tips
– Use High-Quality Ice Cream: For the best flavor, use creamy, high-quality ice cream. Premium brands can elevate your Homemade Choco Tacos.
– Chill Your Tools: Chill the mixing bowls and utensils before preparing your ice cream filling. This helps keep the ice cream firm while you work.
– Play with Flavors: Don’t hesitate to combine different ice cream flavors for a layered effect. Mixing vanilla and chocolate can create a delightful treat.
– Experiment with Taco Shells: Try adding cocoa powder to the taco shell mixture for a chocolatey twist. Additionally, cinnamon can bring a warm spice to the shells.
– Let Tacos Cool Completely: Ensure that the taco shells are completely cool before filling them with ice cream. Filling them while warm can melt the ice cream and mess up the presentation.
Recipe Variations
Feel free to switch things up! Here are a few variations to try:
1. Vegan Option: Use dairy-free ice cream and substitute the egg with a flax egg, made by mixing one tablespoon of ground flaxseed with two and a half tablespoons of water.
2. Gourmet Chocolate Coating: Use dark or white chocolate for coating instead of regular chocolate chips for a gourmet touch.
3. Tropical Twist: Fill the tacos with coconut or pineapple-flavored ice cream and top with toasted coconut flakes for a tropical vibe.
4. Nutty Crunch: Add crushed almonds or peanuts to the ice cream for a crunchy texture. You can also incorporate nuts into the taco shell mixture.
Freezing and Storage
– Storage: Keep your Homemade Choco Tacos in an airtight container in the freezer. They should last up to two weeks for optimal freshness.
– Freezing Tricks: If you want to avoid freezer burn, wrap each taco individually in plastic wrap before placing them in a container.
Special Equipment
You will need a few essential tools to prepare Homemade Choco Tacos successfully:
– Mini Taco Molds: These will help create the signature taco shape.
– Mixing Bowls: Use various sizes for combining dry and wet ingredients.
– Piping Bag: This tool makes it easier to fill the tacos with ice cream precisely.
– Baking Sheet: Line with parchment paper to prevent sticking while baking taco shells.
– Heatproof Bowl: A bowl for melting chocolate in the microwave.
Frequently Asked Questions
How long does it take for the chocolate to set?
It usually takes about 30 minutes in the freezer for the chocolate coating to set completely.
Can I use store-bought ice cream for filling?
Absolutely! Store-bought ice cream can save time and is an excellent option for busy days.
What if I want to make these in advance?
You can prepare the taco shells, fill them with ice cream, and freeze them in advance. Just coat them in chocolate before serving.
Can I change the size of the taco shells?
Yes! You can make smaller taco shells for bite-sized treats or larger ones for more significant servings.
Are these suitable for kids?
Definitely! Homemade Choco Tacos are kid-friendly and can be a fun activity to make together.
Conclusion
Homemade Choco Tacos are not only delicious but also a versatile dessert that can be customized to suit various tastes and dietary preferences. With endless flavor combinations and easy-to-follow instructions, crafting these delightful treats can become a cherished family activity. Whether you’re serving them at a party or enjoying them on a quiet evening at home, these desserts are bound to impress everyone. Take the leap and create your own Homemade Choco Tacos; you won’t be disappointed!

Homemade Choco Tacos: The Ultimate Amazing Recipe for 7 Delicious Treats
- Total Time: 40 minutes
Ingredients
– 1 cup all-purpose flour
– 3 tablespoons powdered sugar
– 1/4 teaspoon salt
– 4 tablespoons unsalted butter, melted
– 1 large egg
– 1 cup ice cream (your choice of flavor)
– 1 cup chocolate chips (for coating)
– 1 tablespoon coconut oil (for melting chocolate)
– Optional toppings (sprinkles, chopped nuts, etc.)
Instructions
Creating delightful Homemade Choco Tacos is easy if you follow these simple steps:
1. Preheat Oven: Preheat your oven to 375°F (190°C). Line a baking sheet with parchment paper.
2. Mix Dry Ingredients: In a mixing bowl, combine flour, powdered sugar, and salt until thoroughly mixed.
3. Combine Wet Ingredients: In a separate bowl, whisk together melted butter and egg until well blended.
4. Combine Mixtures: Gradually add the wet mixture to the dry ingredients until a dough forms. The dough should be soft but not sticky.
5. Shape Tacos: Use about a tablespoon of dough for each taco. Press the dough into mini taco molds or form them into the shape of taco shells using your hands and place them on the baking sheet.
6. Bake: Bake for 8-10 minutes or until the edges are lightly golden. Remove from the oven and let them cool completely.
7. Fill with Ice Cream: Once cooled, carefully fill each taco shell with your chosen ice cream flavor using a spoon or piping bag.
8. Freeze: Place the filled tacos on a tray and freeze for at least 1 hour to ensure they hold their shape.
9. Prepare Chocolate Coating: In a heatproof bowl, combine chocolate chips and coconut oil. Melt in the microwave in 30-second increments, stirring until smooth.
10. Dip Tacos: Once the tacos have firmed up, dip the edges in the melted chocolate to coat and allow excess to drip off.
11. Garnish: Quickly add your favorite toppings before the chocolate sets.
12. Final Freeze: Return the tacos to the freezer again for about 30 minutes to set the chocolate coating.
Follow these easy steps, and you’ll have beautiful, delicious Homemade Choco Tacos ready to enjoy.
- Prep Time: 30 minutes
- Cook Time: 10 minutes
Nutrition
- Serving Size: 7
- Calories: 250 kcal
- Fat: 12g
- Protein: 3g